Kitchener Stitch Instructions: A Comprehensive Guide
Kitchener stitching seamlessly closes live knit stitches, mimicking a new row; tutorials demonstrate this technique, often for sock toes and seamless grafting of knitted pieces.
What is the Kitchener Stitch?
The Kitchener stitch is a grafting technique used in knitting to seamlessly join live stitches together, effectively closing a gap as if a new row had been knitted. Unlike other methods, it creates an invisible join, making it ideal for projects where a clean finish is crucial. It’s essentially a method of sewing live stitches together using a yarn needle and a length of yarn.
This technique mimics the appearance of knitted fabric, avoiding a bulky or noticeable seam. It involves carefully weaving the yarn through the loops of the live stitches, alternating between ‘knit’ and ‘purl’ stitch simulations to maintain the fabric’s structure. Many online resources, including photo and video tutorials, detail this process, often focusing on applications like finishing sock toes or grafting shoulder seams. The result is a professional-looking, durable, and virtually undetectable closure.
The Purpose of Kitchener Stitching in Knitting
The primary purpose of Kitchener stitching is to create an invisible, secure seam in knitted fabric where you need to join live stitches. This differs from simply weaving yarn ends, offering a far more polished and durable finish. It’s particularly valuable when closing the toe of a sock, ensuring comfort and preventing unraveling, or when grafting shoulder seams for a seamless garment construction.
Beyond aesthetics, Kitchener stitch provides structural integrity. The technique effectively mimics the knitted fabric itself, maintaining elasticity and preventing weak points. It’s favored by knitters seeking a professional result, avoiding bulky seams that can detract from the overall appearance of the project. Tutorials emphasize its ability to seamlessly blend two knitted pieces, creating the illusion of one continuous fabric, making it a cornerstone technique for advanced knitting projects.
When to Use the Kitchener Stitch
The Kitchener stitch excels when a nearly invisible join between live stitches is required. Prime examples include finishing the toe of hand-knit socks, where comfort is paramount and a bulky seam would be undesirable. It’s also ideal for grafting shoulder seams in sweaters, creating a professional, seamless look that enhances the garment’s drape and fit.
Furthermore, this technique shines when closing the crown of a hat, providing a neat and secure finish. Knitters also employ it to join sections of colorwork, seamlessly blending different patterns. Unlike other seaming methods, Kitchener stitch maintains the fabric’s elasticity, crucial for items needing stretch. Tutorials highlight its versatility, making it a go-to technique for projects demanding a refined and durable closure.

Materials Needed for Kitchener Stitching
Essential materials include yarn matching your project, a tapestry or yarn needle, and the knitted pieces with live stitches ready for grafting together seamlessly.
Yarn Requirements
Selecting the correct yarn is crucial for an invisible Kitchener stitch. Ideally, use a length of yarn that precisely matches the yarn used in your knitted project – both in fiber content and weight. This ensures the grafted seam blends seamlessly and maintains the overall aesthetic of your work.
The length of yarn needed depends on the number of stitches you’re grafting; a general rule of thumb is to estimate at least six times the number of stitches. It’s always better to err on the side of having too much yarn rather than running out mid-graft. A tail of approximately 6-8 inches (15-20 cm) on each end is recommended for secure weaving in later.
Consider the yarn’s texture; smoother yarns generally work best for Kitchener stitch as they glide through the stitches more easily, creating a neater finish. Avoid highly textured or novelty yarns, as they can make the grafting process more challenging and the seam more visible.
Needle Selection
Choosing the right needle significantly impacts the ease and neatness of your Kitchener stitch. A blunt-tipped yarn needle, also known as a tapestry needle, is the preferred tool. The eye of the needle should be large enough to comfortably accommodate your yarn, preventing fraying or difficulty threading.
The size of the needle should be proportionate to the weight of your yarn. Finer yarns require smaller needles, while thicker yarns necessitate larger ones. Avoid needles with sharp points, as they can snag or split the knitted fabric. Stainless steel needles are a durable and reliable option, offering smooth gliding action.
Some knitters prefer using a curved needle for Kitchener stitching, particularly when grafting over a larger area, as it provides better control and maneuverability. Ultimately, the best needle is one that feels comfortable and allows you to work with precision.
Optional Tools (Yarn Needle, Stitch Markers)
While a yarn needle is essential, several tools can enhance your Kitchener stitch experience. Stitch markers prove invaluable for complex grafts, clearly delineating stitch groupings, especially when working with textured patterns or colorwork. They prevent accidental misalignments and ensure a symmetrical finish.
A row counter, though not directly involved in the stitch itself, aids in keeping track of rows if you’re grafting a significant length. Some knitters find a small pair of scissors helpful for cleanly trimming yarn ends post-grafting. A blocking mat and pins are beneficial for achieving a perfectly smooth, invisible seam after completing the Kitchener stitch.
Ultimately, these are convenience tools; mastering the technique itself is paramount. However, incorporating them can streamline the process and elevate the professional appearance of your finished knitted projects.

Step-by-Step Kitchener Stitch Tutorial
This tutorial guides you through seamlessly joining live stitches, simulating knitting with a yarn needle, and creating an invisible, durable seam for your projects.
Preparing the Live Stitches
Before beginning the Kitchener stitch, careful preparation of your live stitches is crucial for a neat and invisible seam. Ensure you have an equal number of live stitches on two needles – this balance is fundamental to the technique’s success. These stitches should be comfortably loose on the needles, not overly tight, to allow for easy manipulation with the yarn needle.
If your stitches are too tight, gently ease them onto the needles, avoiding stretching or distortion. The goal is to have them readily accessible for pairing. Consider using stitch markers to visually separate the stitches if you find it helpful, especially when working with a large number.
Double-check that you’ve correctly identified the right side and wrong side of your work, as this will influence how you pair the stitches. Having well-prepared, evenly spaced live stitches will significantly simplify the grafting process and contribute to a professional-looking finish.
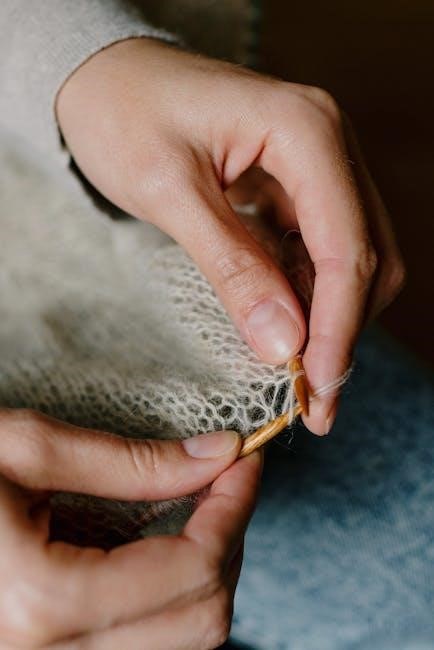
The Initial Knot and Weaving
To initiate the Kitchener stitch, thread a yarn needle with a length of yarn – ideally, the same yarn used for your knitting. Tie a simple knot, leaving a tail of approximately 6 inches for weaving in later. This knot secures the beginning of the graft and prevents unraveling. Begin by bringing the needle up from the wrong side of the fabric, under the first stitch on the first needle.

Now, weave the needle through the corresponding stitch on the second needle, mimicking a knit stitch. This establishes the initial pairing. The key is to maintain consistent tension throughout this process; too tight, and the seam will pucker, too loose, and it will be gappy.
Continue weaving the yarn back and forth between the needles, always pairing one stitch from each needle at a time, creating a secure and nearly invisible join. This initial weaving sets the foundation for the entire Kitchener stitch process.
The ‘Knit’ Stitch Simulation
Simulating a knit stitch is crucial for a neat Kitchener stitch. After weaving between a stitch pair, bring the yarn needle up from beneath the first stitch (from the front). Then, insert the needle into the second stitch as if to knit it, but do not actually knit the stitch – leave it on the needle. This mimics the action of a knit stitch, creating a solid connection;
Pull the yarn through, creating a loop, and then slip the first stitch off its needle. This action effectively ‘knits’ the two stitches together with the yarn, securing them as one. Maintaining even tension is paramount; a consistent pull ensures a smooth, invisible seam.
Repeat this process – yarn up, insert as to knit, pull through, slip the first stitch off – for each subsequent stitch pair, building the grafted seam one ‘knit’ stitch at a time.
The ‘Purl’ Stitch Simulation
To simulate a purl stitch within the Kitchener stitch, the process differs slightly. After weaving between a stitch pair, bring the yarn up from underneath the first stitch, but this time from the back. Insert the needle into the second stitch as if to purl it, again without actually purling – leave it on the needle.
Draw the yarn through, forming a loop, and then slip the first stitch off its needle. This action mimics a purl stitch, continuing the seamless grafting process. Consistent tension remains vital for a professional finish, preventing puckering or looseness.
Continue alternating between the ‘knit’ and ‘purl’ simulations, depending on the stitch pattern you’re joining, ensuring each pair is securely connected. This creates a robust and nearly invisible seam.
Finishing the Kitchener Stitch
Secure the final stitch, weave in yarn ends carefully for a clean look, and block the grafted area to ensure a smooth, seamless, and professional finish.
Securing the Last Stitch
As you approach the end of your Kitchener stitch grafting, meticulous attention to detail is crucial for a durable and invisible seam. After completing the final ‘knit’ or ‘purl’ simulation, you’ll have one stitch remaining on each needle. Carefully draw the yarn tail through the last loop on both needles simultaneously.

Pull gently but firmly to tighten the knot, ensuring it lies flat against the knitted fabric. Avoid over-tightening, which can cause puckering. This final knot effectively anchors the grafted section, preventing unraveling during wear and washing. Some knitters prefer to reinforce this knot with a tiny backstitch using the yarn tail, adding extra security. Remember to leave a sufficient yarn tail for weaving in – approximately 6-8 inches is recommended. A well-secured last stitch is the foundation for a lasting and beautiful finish to your knitted project.
Weaving in the Ends
Once the final stitch is secured, the yarn tails from both the beginning and end of your Kitchener stitch need to be carefully woven in to prevent unraveling and create a clean finish. Using a yarn needle, thread one tail through the knitted fabric, following the path of existing stitches. Avoid pulling too tightly, as this can distort the shape of your work.
Weave the yarn back and forth several times, changing direction to secure it firmly. Repeat this process with the second yarn tail, ensuring it’s woven in a different direction to further reinforce the seam. Trim the excess yarn close to the fabric, being careful not to cut any of the knitted stitches. Properly woven ends are essential for the longevity and appearance of your grafted project, ensuring a professional and polished result.
Blocking for a Seamless Finish
After weaving in the ends, blocking is crucial for achieving a truly seamless and professional-looking Kitchener stitch. Gently wet or steam the area surrounding the grafted seam, taking care not to over-saturate the yarn. Pin the knitted piece to a blocking board, carefully shaping the seam to lie flat and even with the surrounding fabric.
Allow the piece to dry completely, which may take several hours or overnight. Blocking relaxes the yarn fibers, smoothing out any minor irregularities and blending the grafted seam seamlessly into the knitted fabric. This step is particularly important for projects like socks or hats, where a smooth, comfortable finish is desired. A well-blocked Kitchener stitch is virtually invisible, enhancing the overall quality and appearance of your handmade item.
Common Kitchener Stitch Applications
This versatile technique excels at closing sock toes, grafting shoulder seams for seamless garments, and neatly finishing the crowns of knitted hats for a polished look.

Toe of Socks
The Kitchener stitch is exceptionally well-suited for closing the toe of socks, creating a remarkably invisible and durable seam. This method avoids the bulkiness often associated with other seaming techniques, ensuring a comfortable fit within the sock. Many tutorials specifically focus on utilizing Kitchener stitch for sock toes, particularly in top-down sock construction, where live stitches are readily available for grafting.
The process involves carefully pairing live stitches from both needles and weaving the yarn through them in a specific pattern – essentially simulating knit and purl stitches to create a seamless join. Achieving a neat finish requires patience and attention to detail, but the result is a professional-looking toe closure that withstands wear and washing. Experienced knitters often prefer Kitchener for its aesthetic appeal and structural integrity when completing sock projects.
Grafting Shoulder Seams
The Kitchener stitch provides an excellent method for grafting shoulder seams in knitted garments, offering a nearly invisible join that maintains the drape and integrity of the fabric. Unlike traditional seaming methods, Kitchener avoids creating bulky ridges, resulting in a smoother, more professional finish. This technique is particularly beneficial for garments where a clean aesthetic is desired, such as sweaters or cardigans.
Successfully grafting shoulder seams with the Kitchener stitch requires careful alignment of the edges to be joined and precise weaving of the yarn through the live stitches. It’s crucial to maintain consistent tension throughout the process to prevent puckering or distortion. Many knitters find this method superior to mattress stitch for shoulder seams, appreciating its subtle and seamless appearance, enhancing the overall quality of the finished garment.
Closing the Crown of a Hat
The Kitchener stitch is a favored technique for closing the crown of a knitted hat, providing a remarkably neat and secure finish. This method allows for a smooth, almost invisible seam, crucial for maintaining the hat’s shape and preventing unsightly bumps at the very top. It’s particularly well-suited for hats knitted in the round, where a seamless appearance is highly desirable.
When employing the Kitchener stitch to close a hat crown, it’s essential to work with live stitches and a length of yarn. The process involves carefully weaving the yarn through the front and back loops of adjacent stitches, effectively grafting them together. Maintaining even tension is paramount to avoid puckering or creating a distorted crown. Many knitters prefer this method over simply drawing the yarn through all stitches, as it yields a far more polished and professional result.